Have you noticed the Schema icon in the Map Explorer tab and noticed you can create a new SDF or SHP schema? I bet you tried it and got unexpected results. So what is it for and how do you use it? The Help files did not explain it when you clicked on the HELP button either.
Here’s a little tutorial on how to use it. First off what it does is create an empty file with a standard schema, a schema for today’s lesson is the table that holds all the feature values. The default schema contains only two properties, the feature ID (FeatID) and the Geometry but it allows us to add more properties or columns to the data table. So Click on Create SDF… and follow along.
When we create a new schema it wants us to name the file and where to place the file using the standard file dialog box, after you name the new file and click OK it wants to know the coordinate system to assign to the schema. The dialog for this is straight forward so I will not go into this.
The next dialog box is the schema editor, this is where we add new properties to the schema, provide a more realistic name for the schema and a few more options.
Like anything else we need to do some pre-planning as to what properties we want to use, what data type are those properties (string, dates, Boolean, numbers) and what type of geometry (points, polylines, polygons) we need to create. My SDF example will be for a point feature for automobiles (auto) and have properties for manufacturer, date it was purchased, who it is assigned to, model type and of course the feature ID.
Start off by renaming the schema to “Autos” by highlighting the default schema under the Schemas in the left side of the dialog and entering the new name on the right side. You may need to expand the Schemas tree to highlight the default schema.
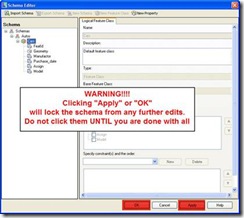
NOW A WARNING!!!
DO NOT CLICK THE OK or APPLY BUTTON.
WARNING!!!!!
Once you click the OK or Apply button you can not edit the schema any more. To move around or apply the changes just click on the schema name or one of the feature classes on the left side of the dialog.
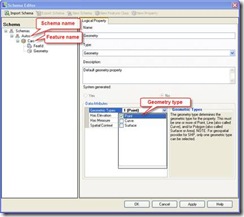
After you rename the schema, expand the schema tree to see the feature class (rename it to cars) and the properties, there are two properties by default, the FeatID and the Geometry. The FeatID does not need to be edited but the Geometry needs to be changed to allow only point geometry. Highlight the geometry property in the tree and under the data attribute section on the right change the Geometry type to 1(point) by clicking on the text box and select the point by removing the check mark on the other two types (Curves & Surfaces). The curve type is for polylines and surface is for polygons.
Editing the geometry type.
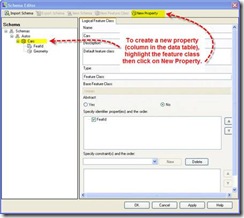
After you set the geometry type, click on the feature name (cars) NOT on the APPLY or OK buttons. With the Feature name highlighted click on New Property from the top menu.
Creating a New Property
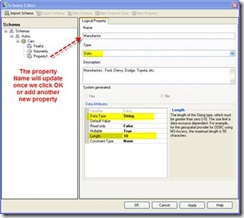
Name the new property Manufacturer, leave the type as data and add a description. In the Data Attributes section set the data type to string and the length to 10.
The Manufacturer Property (Misspelled on purpose)
Next create another new property and name it “Purchase_date”. Keep the default type as data but change the Data Attribute for data type to Date time. This will make that field a date format, MM/DD/YYYY and allow a pop-up calendar to select the date when you edit the field. Next create a property name it Assign, keep it as a string data and set the length to 25, the length attribute needs to be large enough to hold the complete name of the person that is assigned to that car. Last we create a new property for the model type of the vehicle my example is using model types of “Luxury, Sport, and Hybrid”. Keep the data type as string but instead of setting a length and allowing the user to enter “Luxery” instead of Luxury we create a constraint and a list of values that are acceptable for the field value.
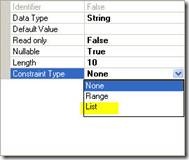
The Constrain Type.
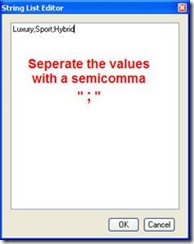
To do this under the Data Attributes in the “Constraint Type” identifier use the drop down list and select “List”. A new identifier will be listed in the Data Attributes identifier list named “Value List” and a value of Collection. When you select (click on) the identifier an ellipse icon will display next to the value, click on it to open up the “String List Editor”. This dialog will allow you to enter the values you want to restrict for that field. In the string list editor enter Luxury, Sport and Hybrid using the semicolon as a separator between the values.
The String List Editor.
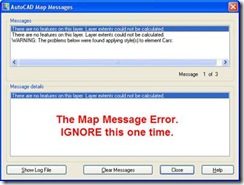
Now we have all the properties and attributes for our new SDF schema we can click Apply and OK. After you click OK/Apply you will get an Error Message in MAP3D, this is normal and you can ignore it this time.
Error Message on applying the new schema.
Now use the display manger and right on the Cars Layer and Create a new cars point, pick a point for the feature and enter some values in the data table. When you select on the purchase_date column the current date is enter and a drop down arrow icon is displayed, clicking on the arrow will open up a calendar allowing you to select another date.
Adding a New Feature and the Attributes.
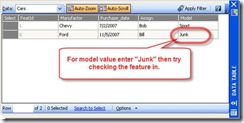
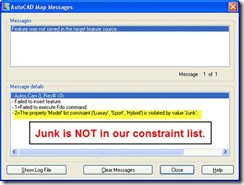
For the model value we told the schema that we only wanted Luxury, Sport or Hybrid as the values, BUT we can enter Junk at this time however if we check in the feature we will get an error.
Enter Junk for Model.
The Junk Value Error Message.
Because Junk is not an acceptable value we get the warning and the feature did not get checked in nor written back to the SDF file. This is one warning you can not ignore and needs to be corrected. Just go back and add an acceptable value then check the feature in.
Summery: Now you can start creating SDF or SHP files from scratch or using standard AutoCAD geometry and add “your” attributes to those features using FDO and not having to create Object Data or Object Classes then export the way we did prior in previous releases of AutoCAD Map. Try it out and let me know what features you want in the schema editor or data tables. Last don’t forget after you create the new schema to create the Meta Data for it, if you are using Map 3D 2008 you have the tools to do this easy.

Recent Comments